DC dual-arm bridge use method: 1. The bridge is stable; 2. Estimate the unknown resistance value, selection ratio, resistance value, and connected resistance. 3. Open the galvanometer lock, zero, select the lower sensitivity of the current detection sensitivity; 4. Turn on the power switch, adjust the reading plate, override plate, to the galvanometer is zero; 5. Increase the sensitivity of galvanometer, and then test; 6. Recorded on the case; (reduction of wire resistance if necessary) 7. Cut off the bridge power supply, the galvanometer is locked to zero; 8. Disconnect the connection and put away the bridge. DC dual-arm bridge technical parameters Measuring range 5μΩ~11.000Ω Magnification Range Resolution Accuracy ×10 0.100 to 1.100 mΩ 5μΩ 5% ×10 1.00 to 11.00 mΩ 50μΩ 5% ×10 10.0 to 110.0mΩ 500μΩ 2% ×10 0.100 to 1.100Ω 5mΩ 2% ×1 1.00 to 11.00 Ω 50mΩ 2% Bridge Power Supply 1.5V (six 1.5V dry cells in 6-cell parallel) Finger meter power supply 9V (2 sections 6F22 laminated battery) Dimensions (W) 230mm × (H) 200mm × (D) 140mm weight 2.5kg DC dual-arm bridge technical requirements 1 appearance and logo 1.1 The nameplate or housing of the bridge shall have: Product name, model, factory number, manufacturer's name or trademark; Effective range and total effective range; The accuracy level of each effective range; Test voltage. 1.2 The terminals on the bridge should have obvious signs of use. There should be a seal on the bridge. 2 The basic allowable error of the bridge should meet the following formula: Where: Elim-bridge's allowable basic error (Ω); RN-reference value (Ω); X-scale disc indication (Ω); K-value specified by the manufacturer, but must be ≥ 10; A-accuracy level. Relative error: 3 The insulation resistance of the bridge should meet the following two requirements at the same time: 3.1 In the total effective range of the bridge, when the bridge is balanced, any terminal on the bridge (unless the manufacturer prescribes that the terminal does not permit grounding) and the enclosure (the enclosure must be grounded, if the bridge enclosure is insulated Materials, the bridge is placed on the metal plate, and the metal plate is grounded.) The error caused by the deflection of the galvanometer should not exceed 1/10 of the basic error allowed by the bridge. 3.2 Insulation resistance between any point on the bridge circuit that is not electrically connected to the line ≥ 100 MΩ. 4 Bridge circuit insulation voltage test requirements Under the specified conditions, the connection between the measuring line and the reference ground for testing shall be able to tolerate an actual sine wave AC voltage with a frequency of 45-65 Hz for 1 min without breakdown or discharge. Note: The line isolation voltage refers to the highest voltage to ground that the bridge can operate. The reference grounding terminal in the line insulation voltage test shall include all exposed metal parts that are not electrically connected to this line. If there is no metal part on the insulation case, the metal foil wrapped by the bridge to be inspected shall have a gap of 20mm between the metal foil and the terminal. 5 The bridge with the included nulling meter should have the following requirements: 5.1 Sensitivity requirements Within the specified operating voltage and total effective range of the bridge, the bridge measuring terminal is connected with the upper or lower limit of the resistance measurement. When the bridge is balanced, the (a/10)% of the bridge measuring plate (or the measured resistance) is changed. When (a is the accuracy level of the detected bridge), the deflection of the nullmeter should not be less than 1 division (1 division not less than 1 mm). When the above requirements are not met, the bridge must have the terminal button of the external null meter, but the minimum sensitivity of the included zero meter should not be less than 1 grid/(a% × R) (R is the measured resistance or bridge reading). 5.2 Damping time requirements The damping time of a single-bridge or double-bridge finger-finish instrument should not exceed 4s; the damping time of the zero-numerator of a single- and dual-use bridge should not exceed 6s. 5.3 Structural Requirements The zero meter should have mechanical zero adjustment and locking device. 5.4 The use of electronic amplifiers should also meet the following requirements: 5.4.1 Warm-up time The preheating time of bridges and attached zerometers whose accuracy level is less than or equal to 0.2 should not exceed 5min; the rest time of preheating of the zeroth instrument should not exceed 15min. 5.4.2 pointer drift After the pointing device is warmed up, the pointer drifts within 1 minute to 1 square; within 4 hours, the pointer drifts to 5 grids. 5.4.3 Pointer Jitter It is not easy to see with the naked eye. 5.4.4 Structural Requirements There should be an electrical zero adjustment mechanism. If the pointer drifts less than 1 square within 10 minutes in the use temperature range, the electrical zero adjustment mechanism may not be installed. Second verification conditions 6 Verification of the environmental conditions of the bridge 6.1 Check the temperature and relative ambiguity conditions for the basic error of the bridge. 6.2 Bridge insulation resistance measurement and line insulation voltage test conditions are: Temperature: 15 ~ 35 °C; Relative humidity: 45 to 75%; No dew, seepage, rain, sunlight, etc. 7 When the bridge is inspected, the total uncertainty caused by the standard equipment, certified ancillary equipment and environmental conditions shall not exceed 1/3 of the basic allowable error of the detected bridge. 8 When the overall method is used to test bridges, the accuracy level of the standard resistance box should not be lower than that specified. 9 When the components are tested on the bridge, the allowable error of each bridge arm resistance element, the measurement error and the standard resistance accuracy grade (B) Range Converter Note: (1) The “standard resistance†in the table refers to the standard resistance accuracy level selected when using the replacement or replacement method for the bridges that are verified by the components. (2) In the table, the "rounded number of digits" refers to the first point of each measuring disk, and the last digits of other points are aligned with the last digit of the first point; (3) When the "permissible error" in the table is ≥ 0.1%, 0.02 class bridges can be used for direct measurement, so the "standard resistance" in the table is not listed; (4) Bridges with an accuracy level of less than 0.05 are generally tested by the overall method, so they are not included in the table; (5) The “permissible error†in the table is that the bridge is allocated according to the error of the component inspection time and cannot be used as the basis for determining whether the detected bridge is qualified or not. If the error of the resistance component in the verification result is less than the “permissible error†listed in the table, the basic error of the bridge is acceptable; if the error of some resistance components in the verification result exceeds the “allowable error†in the table, it must be Calculate the maximum integrated error of the detected bridge to determine whether the bridge being tested is qualified. 10 If the bridge is to be verified by a component, the replacement method or replacement method shall be used to check the time. The error caused by the measuring device shall not exceed 1/10 of the allowable error of the detected resistance component. 11 When checking the bridge, the error caused by the galvanometer sensitivity valve should not exceed 1/10 of the allowable error. 12 The error caused by the residual potential in the verification device, the contact resistance of the switch and its variation, the leakage due to the connecting wire resistance, the insulation resistance, and the static electricity shall not exceed 1/20 of the allowable error. In the case of half-integrated test bridges, the error distribution of the range converter and measurement disk is 1/2 of the basic allowable error of the bridge. 14 The current flowing through the calibrator and the bridge under test shall not exceed their permissible value during the entire process of testing the bridge. If there is no specific provision for this, the current corresponding to 0.05W power should not be exceeded, but it must not exceed 0.5A. 15 Other error distribution methods are allowed under the condition that the total uncertainty of the verification is guaranteed. 16 The requirements for measuring the insulation resistance instrument are: a. Measurement error: ±30%; b. DC voltage: 500V ± 10%. 17 The requirements for high voltage test benches for line insulation voltage tests are: a. There is enough output power. The test method is to first empty the high voltage output terminal (ie, open circuit), and raise the voltage to 1/2 of the voltage to be tested, set it to u, then connect the bridge under test and observe the drop of the power supply voltage at that time. If the voltage drop is less than 0.1u, it can be considered that the high voltage test bench has enough output power; b. Insulation strength test voltage error: ± 25%; c. In case of insulation breakdown, the relay can automatically cut off the high-voltage power supply. Its operating current is 5mA. This current is the high-side output current. d. Power frequency: 45 ~ 65Hz; e. The output voltage regulation fineness is less than 100V. Three verification projects 18 DC Bridge Verification Project Four verification methods 19 The method of verification of bridges generally includes three types: overall verification, semi-integral verification and component verification. The overall test is to use the resistance of the standard resistance box to compare the indication of the bridge under test to determine the basic error of the bridge. According to the component test, the resistance of each resistance element of the detected bridge is measured. Through a certain formula calculation, the basic error of the detected bridge is determined. Semi-integral verification is the overall inspection of the range converter (or measurement disk), according to the component verification measuring disk (or range transformer), and then through a certain formula to determine the basic error of the bridge detected. 20 The verification steps are as follows: 20.1 Visual Inspection According to the requirements of Article 1, inspect the nameplate or the mark on the housing, and check the contact condition of the housing, the exposed parts and the plug, and the seal position. The newly-produced bridges are required to be in good condition; for in-use and repaired bridges, if one of them has been found to have seriously affected the electrical performance of the bridge, it should be repaired and then verified. 20.2 Line Inspection Use a resistance meter to check the internal resistance components of the bridge. There should be no open circuit or short circuit. The actual circuit of the bridge and the nameplate circuit (or the line in the instruction manual) should be consistent. For a bridge equipped with an attached zero meter, it should also check whether the zeroing mechanism is normal. To accurately identify the bridge of the component, you must find the node of the bridge (also called the vertex) and determine the timing of the timing of the inspection, as shown in Figure 1. A single bridge is to verify the resistance of AB, BC and DA between A, B, C and D nodes; double bridge is to have AC between A, B, C, D, E and F nodes. The resistances of BD, AF, and BE are tested. After appearance and circuit inspection, the bridge under test shall be stable for at least 24 hours under the conditions specified in clause 6.2. 20.3 Measurement of Bridge Insulation Resistance Figure 1 Single and Double Bridge Locations 20.3.1 Test of Influence of Insulation Resistance on Overall Error Ground the shell of the bridge to be inspected (if the bridge of the bridge being tested is made of insulating material, and if there is no grounding terminal, place the bridge on the metal plate and then ground the plate). Connect the measuring terminal of the bridge under test with a resistor whose value is equal to the upper limit value of the total effective range. Adjust the measuring plate to balance the bridge. At this time, the sensitivity of the zero meter should not be lower than 1 grid/(a/ 10)%Rx). Then take another grounding wire to be connected to each terminal button of the bridge to be inspected (except for the terminal that the manufacturer does not allow to ground). Observe the error caused by the deflection of the pointing device. If it is not larger than 1/10 of the allowable basic error of the detected bridge, consider that the insulation resistance of the bridge affects the overall error test, as shown in Figure 2. 20.3.2 Measurement of the insulation resistance between points on the bridge line and the line without electrical connection. Measuring method: The two test ends of the insulation resistance measuring instrument are respectively connected to the bridge circuit and the metal points that are not electrically connected to the circuit, and the insulation resistance is measured. The reading on the insulation measuring instrument should be 1 to 2 minutes after the voltage is applied. Between. Fig. 2 Influence of bridge insulation resistance on overall error 20.4 Line Insulation Voltage Test All terminals of the bridge to be inspected are connected together with bare copper wires. The two test ends of the high voltage test bench are respectively connected to the bridge ground and the reference ground terminal for testing, and gradually raise the voltage when they reach the specified test voltage. After that, keep 1min. If I breakdown or discharge phenomenon, it is considered that the line insulation voltage test is qualified. When testing the above items, special attention should be paid to safety, and strictly in accordance with the relevant high-voltage test bench operating specifications. After the insulation resistance measurement and the line insulation voltage test, the bridge under test is placed under the condition of the verification temperature and relative humidity, and the stability is not less than 2 hours, and then the following verification is performed. 20.5 Sensitivity Test of Electronic Finger Gage The test for the sensitivity of the null meter inside the bridge shall be performed on the upper and lower limits of the measured resistance of the total effective range of the bridge being tested. The supply voltage of the bridge should be based on the manufacturer's relevant regulations. The measuring terminals are respectively connected with the resistances of the upper and lower limits of the total effective range of the bridge. The measuring disk is adjusted to balance the bridge, and then the resistance (or the resistance of the measuring disk) is changed by RX×a%, and the zero meter is observed. The deflection should not be less than the requirements of paragraph 5.1. 20.6 Test of Damping Time of Finger-free Instrument in Bridge The test of the damping time of the nulling instrument shall also be performed on the upper and lower limits of the resistance measurement of the total effective range of the detected bridge. Adjust the measuring plate so that the pointer of the zero meter is deflected to fullness, then cut off the power supply to the bridge, and use the stopwatch to measure the time from when the pointer returns from the full scale to leaving the zero line ≤ 1 min. 20.7 Bridge zero finger drift and pointer jitter
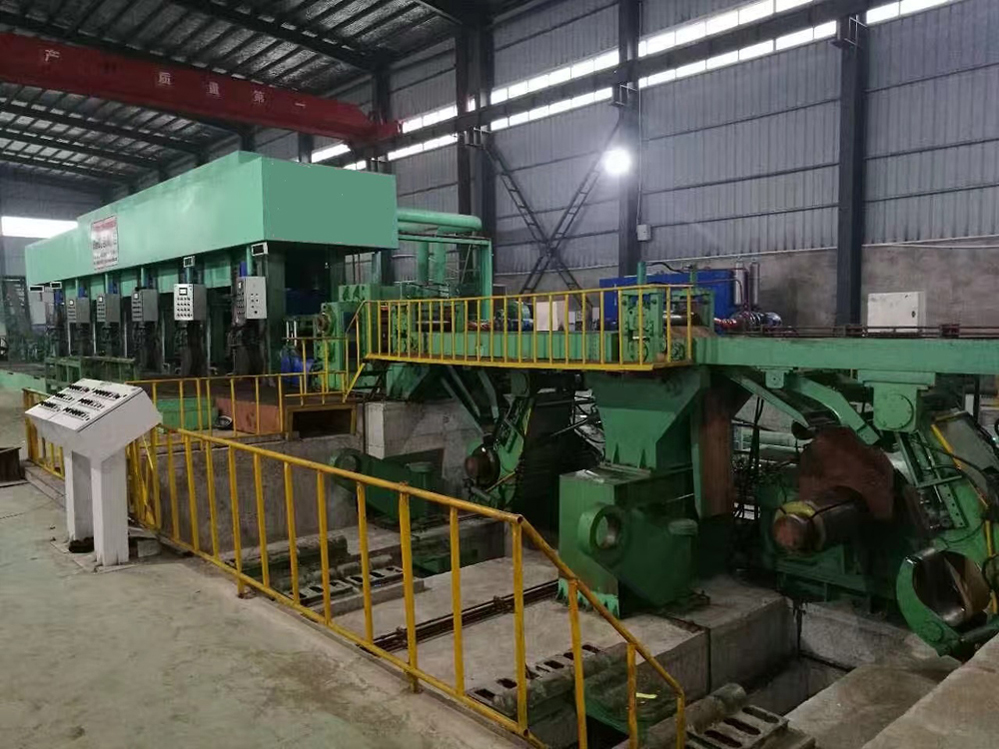
Tandem Cold Rolling Mill Line means continuously rolling metal strip by going through two rolling mills, three rolling mills, four mills, five mills, even 6 mills to output the required gauge once rolling.
Tandem rolling mill gives high production, thousands of tons cold rolled coils per year, and higher metal strip utilization percentage. Big scale cold rolling mill plants must have tandem mill to meet market demand.
To know what model, capacity of tandem cold rolling mill, we need cusotmer to tell his steel strip max width, input and output thickness, yearly production.
We can do turnkey project of cold rolling mill complex, welcome you to consult!
Tandem Cold Rolling Mill,Continuous Thickness Reducing Machine,Tandem Rolling Mill Line,Continuous Cold Rolling Mill Wuxi Jinye Hydraulic Pneumatic Complete Set Of Equipment Co.,Ltd. , https://www.jinye-machine.com


